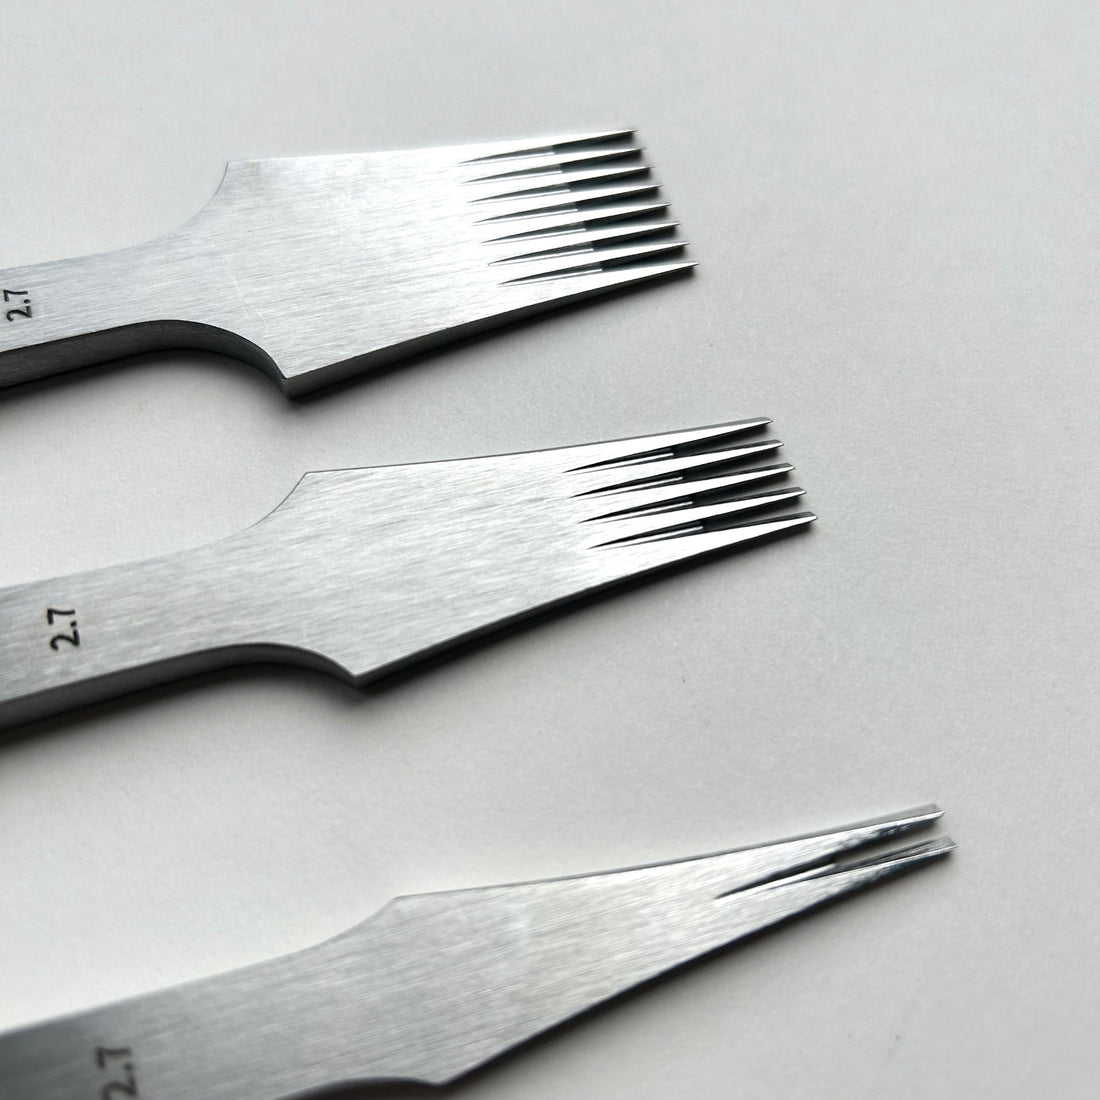
The Ultimate Guide to Leather Pricking Irons
The Ultimate Guide to Leather Pricking Irons
If you're venturing into the world of leathercraft, you'll quickly discover that creating professional-looking stitching requires more than just a needle and thread. Enter the pricking iron—a deceptively simple tool that separates amateur work from true craftsmanship. This comprehensive guide will walk you through everything you need to know about these essential instruments.

What Is a Pricking Iron?
A pricking iron (also called a stitching chisel or lacing chisel) is a multi-pronged tool used to mark or pierce evenly spaced holes along a stitch line in leather. Unlike an awl, which creates individual holes one at a time, a pricking iron features multiple teeth arranged in a perfectly straight line, allowing you to mark several holes simultaneously with consistent spacing.
The term "pricking iron" specifically refers to tools designed to mark the leather surface rather than pierce all the way through, though many craftspeople use the terms interchangeably with stitching chisels, which do punch through the leather completely.
Why Use a Pricking Iron?
Consistency and Precision
The primary advantage of using a pricking iron is the perfectly uniform hole spacing it provides. Hand-measuring and marking individual holes is not only time-consuming but also prone to error. Even slight inconsistencies in spacing become glaringly obvious once your work is stitched, creating an amateurish appearance.
Professional Appearance
Evenly spaced stitching is the hallmark of quality leatherwork. Whether you're creating a wallet, belt, or saddle, consistent stitch lines elevate your work from homemade to handcrafted.
Efficiency
Once you've mastered the technique, pricking irons dramatically speed up your workflow. What might take half an hour to mark with a ruler and awl can be accomplished in minutes.
Types of Pricking Irons
European vs Japanese Style
European pricking irons feature straight, chisel-like teeth that create vertical slits in the leather. These are typically used with a mallet to pierce through the leather completely in one stroke.
Japanese pricking irons (also called diamond chisels) have teeth shaped like elongated diamonds, creating angled holes that accommodate saddle stitching beautifully. The angled holes make it easier to pass needles through and create a distinctive slanted stitch appearance on the finished piece.

Number of Teeth
Pricking irons come with varying numbers of teeth, typically ranging from one to twelve prongs:
- Single prong: Used for corners, curves, and tight spaces where multi-prong tools won't fit
- Two prong: Excellent for maintaining consistent spacing around curves and for finishing stitch lines
- Four to six prong: The workhorses of leathercraft, ideal for straight runs and general use
- Eight to twelve prong: Used for long, straight seams where speed is essential
Most leatherworkers find a set with 2-prong, 4-prong, and 6-prong irons covers the majority of their needs.
Stitch Spacing
Pricking irons are available in various stitch spacings, typically measured in stitches per inch (SPI) or millimetres between teeth:
- 3-4 mm (6-8 SPI): Creates a bold, visible stitch line suitable for rustic work, bags, and belts
- 3 mm (8-9 SPI): A versatile middle ground popular for general leatherwork
- 2.5 mm (10 SPI): Finer stitching for wallets, card holders, and refined pieces
- 2 mm or less (12+ SPI): Very fine stitching for delicate work and high-end items
Choosing Your First Pricking Iron
For beginners, here's what I recommend:
Start with 3-4mm spacing: This is forgiving for learners and works well with commonly available thread sizes. Finer spacing requires more precision in your technique.
Invest in quality: A well-made pricking iron will last decades. Look for hardened steel with precisely machined teeth. Japanese and French manufacturers are particularly renowned for quality.
Buy a starter set: Begin with a 2-prong, 4-prong, and single prong in the same spacing. This combination handles approximately 90% of leatherworking projects.
Consider your projects: If you're primarily making belts and bags, opt for wider spacing (3.5-4mm). For small leather goods like wallets, 3mm or less is more appropriate.
How to Use a Pricking Iron
Basic Technique
-
Mark your stitch line: Use a wing divider or overstitch wheel to create a guideline approximately 3-4mm from your leather edge.
-
Position the iron: Align the first tooth or two teeth of your pricking iron with your marked line, holding it perfectly vertical.
-
Strike carefully: Using a mallet (never a metal hammer, which can damage the tool), strike the iron firmly but not violently. For marking only, a light tap suffices. For punching through, you'll need more force depending on leather thickness.
-
Walk the iron: Place the last tooth of your iron into the last hole you just created, then strike again. This ensures perfectly consistent spacing. Repeat along your stitch line.
-
Use smaller irons for curves: Switch to your 2-prong or single prong when approaching corners or curves, maintaining spacing by using the last hole as your reference point.

Tips for Success
-
Keep it vertical: The most common mistake is allowing the pricking iron to tilt. This creates angled holes that make stitching difficult. Hold the iron perpendicular to your work surface.
-
Use a proper surface: Work on a dedicated striking surface like a poundo board, cutting mat, or granite block. This protects your tools and provides the resistance needed for clean holes.
-
Mark first, then punch: For complex pieces, use your pricking iron lightly to mark all holes first, then go back to punch through. This allows you to check your layout before committing.
-
Maintain consistent force: Develop a rhythm with your mallet strikes. Inconsistent force can result in holes of varying depth.
Care and Maintenance
Sharpening
Over time, pricking iron teeth will dull, making punching more difficult and potentially tearing leather fibres rather than cutting cleanly. You can sharpen them using fine diamond stones or send them to a professional tool sharpener. For Japanese-style irons, maintain the diamond profile carefully.
Storage
Store pricking irons in a way that protects the teeth from damage. Tool rolls, individual pouches, or dedicated drawer organisers work well. Never toss them loosely in a toolbox where the teeth can strike other metal tools.
Cleaning
Wipe your pricking irons clean after use to remove any leather residue or oils. A light coating of camellia oil or tool wax prevents rust, particularly important in humid climates.
Common Mistakes to Avoid
Using them on thick leather stacks: Pricking irons work best on leather up to about 3-4mm thick per layer. For thicker pieces or multiple layers, mark with the iron, then use an awl to enlarge the holes.
Forcing through too quickly: Punching through leather requires multiple firm strikes, not one mighty blow. Patience produces cleaner results.
Neglecting to pre-mark curves: Trying to follow a curved line with a multi-prong iron leads to wandering stitch lines. Always pre-mark curves with an overstitch wheel or wing divider first.
Mixing spacing sizes: Each project should use consistent spacing throughout. Switching between 3mm and 4mm irons partway through looks unprofessional.
Beyond the Basics: Advanced Techniques
Creating Decorative Patterns
Some leatherworkers use pricking irons creatively to create decorative perforated patterns in leather, though purpose-made stamps are better for this application.
Box Corners and Mitred Joints
Matching up stitch holes at corners requires careful planning. Use your single prong to carefully place corner holes that align with your established spacing on both sides.
Saddle Stitching with Pricking Irons
When using pricking irons with traditional saddle stitching, the angled holes created by Japanese-style irons allow your needles to cross properly in the centre of the leather, creating that distinctive saddle stitch appearance on both sides.
Pricking Irons vs Alternatives
Stitching Wheels
Overstitch wheels mark a series of divots along your stitch line but still require an awl to create each hole individually. They're useful for marking but less efficient than pricking irons for actually creating holes.
Awls
A scratch awl or diamond awl creates individual holes with complete control over placement. Whilst this offers maximum flexibility, it's time-consuming and requires significant skill to maintain consistent spacing. Many craftspeople use awls in conjunction with pricking irons, using the iron to mark holes and the awl to enlarge them if needed.
Sewing Machines
For some applications, a leather sewing machine might seem like the modern alternative. However, hand stitching remains superior for many projects, offering stronger seams, better appearance, and the ability to work with very thick leather or complex shapes that machines cannot handle.
Conclusion
The pricking iron is one of those tools that seems almost too simple to matter—until you use one. The difference between hand-marked holes and precisely spaced holes created with a quality pricking iron is immediately apparent in your finished work. Whether you're just beginning your leathercraft journey or looking to elevate your existing skills, investing in a good set of pricking irons and learning to use them properly will transform your projects.
Start with a basic set, practise the technique on scrap leather, and soon you'll wonder how you ever managed without these elegant, efficient tools. Your leather goods will thank you—and so will anyone who admires your impeccably straight, perfectly spaced stitching.
Happy stitching!
