


British Leather Supplies
Large Poppers - Antique Brass - 13mm or 15mm Head Diameter
Large Poppers - Antique Brass - 13mm or 15mm Head Diameter
Couldn't load pickup availability
Large Poppers (Line Snaps) in Antique Brass
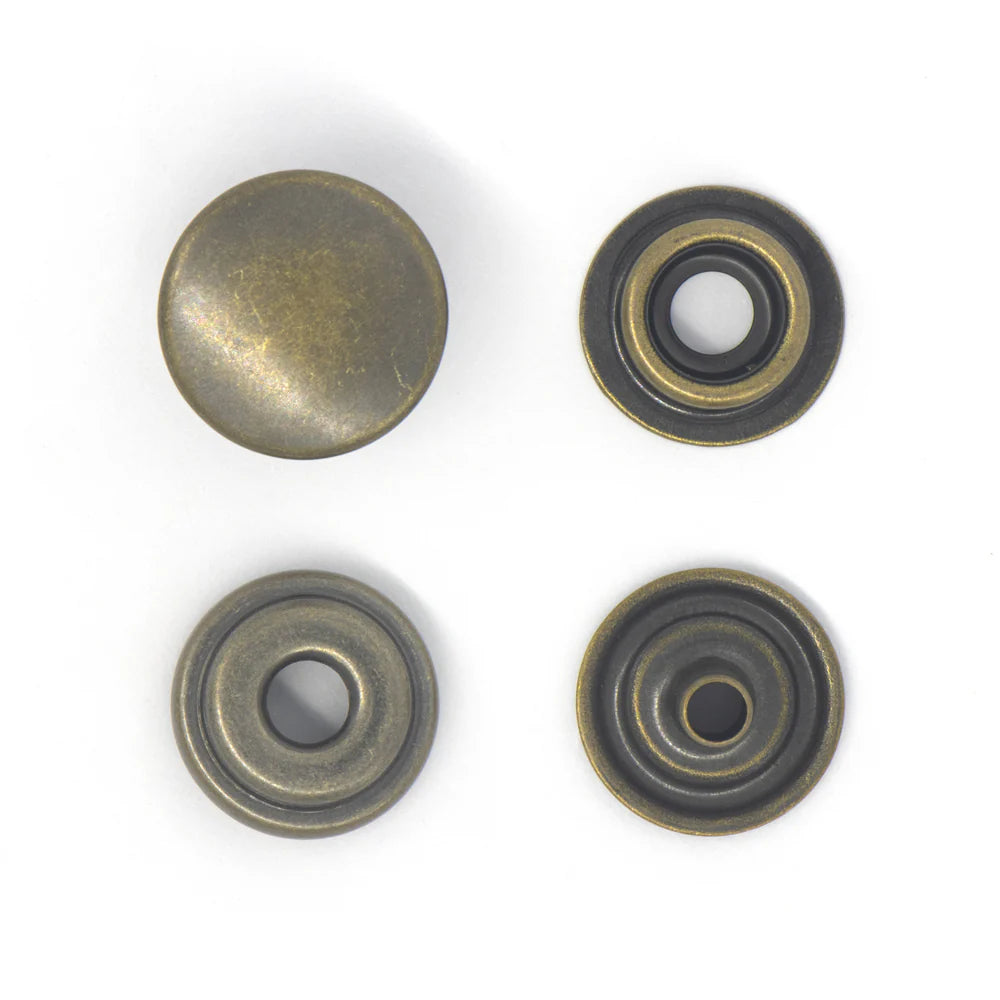
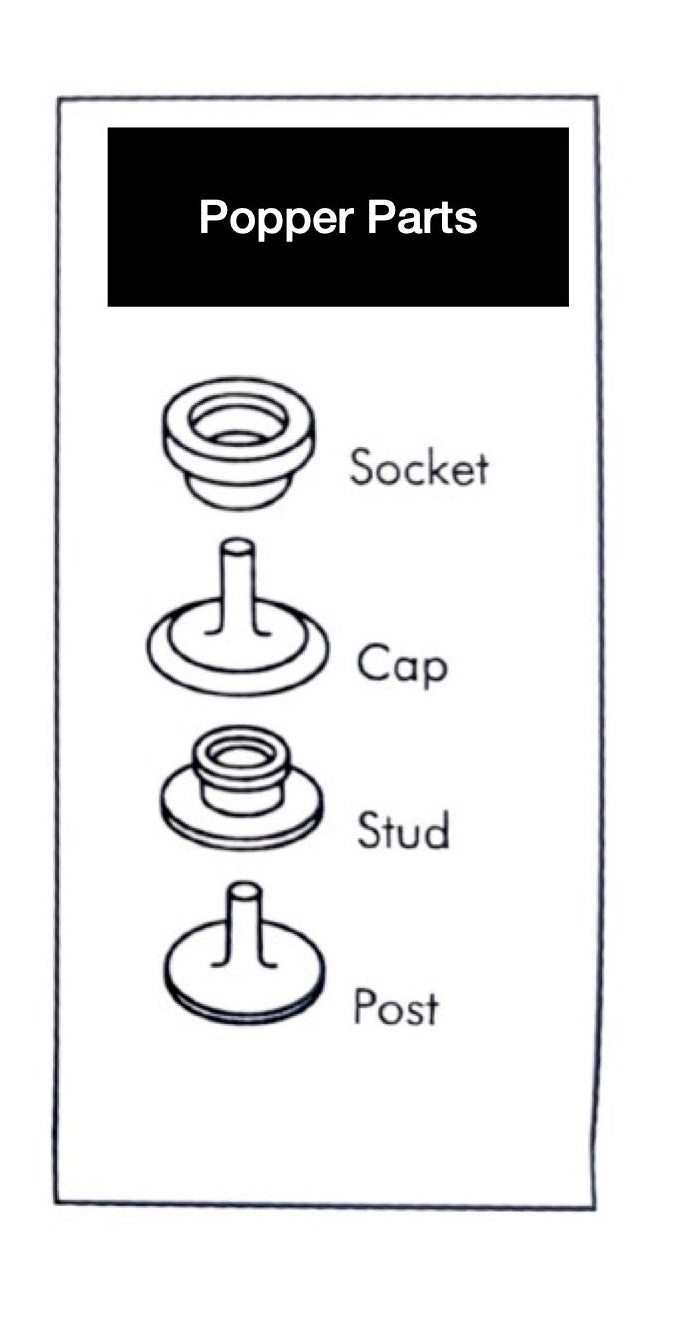
The large poppers in antique brass consist of four components; a top cap, secured to the material with a socket, and a bottom stud, paired with an eyelet. The strong spring in the socket grips onto the groove in the stud to hold both sides firmly together.
Product Specifications:
The poppers come in a set of 10, in 13mm or 15mm head diameter.
The 13 mm head popper snap has a cap of 13mm (1/2") and post of 5mm (3/16").
The 15 mm head popper snap has a cap of 15mm (9/16") and post of 8mm (5/16").
Recommended for use with our popper snap setter tools.
- Trusted by Leatherworkers
- Returns Within 30 Days
- Fast UK Shipping, Free Over £50
Collapsible content
Rivets vs. Chicago Screws in Leather Crafting: Choosing the Perfect Fastener
Leather crafting is a timeless art where each tool, material, and technique contributes to the creation of a masterpiece. Among the many decisions artisans face, selecting the right leather hardware is vital. Rivets and Chicago screws are not just functional elements; they are integral to both the aesthetic and durability of your leatherwork. But how do you decide between them?
This detailed guide will explore the differences, advantages, and ideal uses of rivets and Chicago screws. Whether you’re crafting bespoke handbags, intricate belts, or elegant wallets, understanding these leather fasteners will elevate your creations to new heights.
Why Fasteners Matter in Leather Crafting
Fasteners do much more than hold leather pieces together; they enhance design, add structural integrity, and define the overall quality of a piece. Choosing the wrong fastener can compromise not only the durability of your work but also its aesthetic appeal. Rivets and Chicago screws remain the two most popular options due to their versatility and strength. Here, we’ll unravel the unique qualities of each to help you make an informed choice.
What Are Rivets?
Definition
Rivets are permanent mechanical fasteners consisting of two parts—a cap and a pin—which are typically made of metal. Once set, they provide a secure hold by gripping the layers of leather between them.
Characteristics of Rivets
- Material Options: Often made of brass, copper, or steel, rivets come in various finishes, including polished, antique, and matte.
- Durability: Rivets offer unmatched strength and are ideal for heavy-duty projects that require a strong, permanent bond.
- Ease of Use: Setting rivets requires specific tools, such as a rivet setter or press, but the process is relatively simple for artisans of all skill levels.
- Non-removable: Once affixed, rivets cannot be easily removed without damaging the leather.
Applications
- Strength-demanding projects like saddles, harnesses, and straps
- Items subject to frequent wear and tear, such as belts and work bags
- Decorative purposes, adding an industrial or vintage aesthetic to projects
Pro Tip
For added refinement, polished rivets with matching caps can elevate the overall look of a piece while ensuring high performance.
What Are Chicago Screws?
Definition
Also known as binding screws or post screws, Chicago screws are two-piece fasteners composed of a barrel with internal threads and a screw that fits into it. Unlike rivets, they are removable and reusable.
Characteristics of Chicago Screws
- Material Variety: Commonly crafted from brass, aluminium, or stainless steel, Chicago screws often feature elegant finishes to suit different designs.
- Reusability: Chicago screws can be unscrewed and adjusted, making them ideal for projects requiring flexibility or future modifications.
- Aesthetic Appeal: Their clean, cylindrical design offers a sleek, polished look, enhancing both modern and classic styles.
- Assembly: While they require precision during installation, the process is straightforward with basic tools like a screwdriver.
Applications
- High-end leather goods where aesthetics and adjustability are key, such as portfolios, wallets, and luxury handbags
- Projects requiring periodic disassembly, such as belts with interchangeable buckles
- Decorative accents on minimalist or contemporary designs
Pro Tip
Choose Chicago screws with flat or dome caps to complement your leather's finish and ensure a seamless design flow.
Rivets vs. Chicago Screws: Key Differences
Durability vs. Versatility
Rivets are unbeatable for their strength and permanence, making them the go-to for projects that require heavy-duty endurance. Chicago screws, while strong, shine in their versatility and ability to be disassembled and reused.
Aesthetics
Rivets lend a rugged, industrial feel to leather items, perfect for vintage-style or utilitarian designs. Chicago screws, on the other hand, excel in elegance and offer a refined, streamlined look that complements modern craftsmanship.
Functionality
- Rivets are suited for projects where the fastener will remain undisturbed, such as heavy-duty straps or decorative accents.
- Chicago screws are ideal for items that may need adjustment or repair, like portfolios, adjustable belts, or items with interchangeable components.
Tools and Installation
Rivets require specialised setting tools and a solid base for installation. Chicago screws simply need a screwdriver, making them slightly more user-friendly for beginners or those without access to a full workshop.
Cost
While both fasteners are generally affordable, rivets tend to be a more cost-effective option for large-scale or utility-focused projects. Chicago screws, being more intricate in design, may carry a slightly higher price tag.
How to Choose the Right Fastener for Your Project
1. Consider the Functionality
Ask yourself whether the fastener will need to be adjusted or removed. If you need flexibility, Chicago screws are the clear winner.
2. Prioritise Strength or Style
For heavy-duty strength and durability, rivets are unmatched. For an elegant, polished look that complements high-end leather goods, opt for Chicago screws.
3. Evaluate Tools and Skill Level
If you’re new to leather crafting or have limited tools, Chicago screws may be easier to work with initially.
4. Think About Aesthetic Harmony
Match the material and finish of your fastener to the type of leather and overall design of your project.
5. Factor in Potential Adjustments
If you anticipate that your project may require changes or repairs, the reusability of Chicago screws will save you time and effort.
The Heritage and Importance of Craftsmanship
Both rivets and Chicago screws embody the tradition of craftsmanship, each lending its unique qualities to the art of leatherworking. Rivets, with their rugged durability, speak to an era of utilitarian, long-lasting design. Chicago screws, with their refined versatility, celebrate modern innovation while honoring the timeless elegance of handcrafted pieces.
By understanding their distinct features and applications, leather artisans can make informed choices that not only enhance their creations but also uphold the heritage of quality and craftsmanship.
Elevate Your Leatherwork Today
The choice between rivets and Chicago screws ultimately comes down to the specific needs of your project. Whether you're creating a rugged harness or an elegant portfolio, these fasteners will help bring your vision to life with precision and style.
Want to learn more about perfecting your leatherworking techniques? Explore our other guides and resources to enhance your craft and ensure every stitch and fastener tells a story of quality and heritage.
Happy Customers
Customers Love British Leather Supplies
Read reviews of British Leather Supplies to find out why customers from the leather industry and home crafters enjoy our products and service.