The Essential Guide to Using a Leather Awl for Beginners
Share
The Essential Guide to Using a Leather Awl for Beginners
Are you ready to start working with leather but feel overwhelmed by the intricacies of the tools involved? One essential tool every leatherworking beginner should master is the leather awl. Whether you're creating handmade wallets, belts, bags, or intricate designs, the leather awl opens the door to precision stitching and clean hole-punching.
This guide will walk you through everything you need to know about using a leather awl, including its purpose, types, and step-by-step instructions for getting started. By the end, you’ll be equipped to start your leatherworking projects with confidence.
What Is a Leather Awl?
A leather awl is a small but powerful tool used in leather crafting. It’s designed for punching holes, marking patterns, and aiding in precise stitching. Think of it as your leatherworking multitool—it makes it easier to create clean, professional finishes.
A typical leather awl consists of three main parts:
- Handle: Provides grip and stability for precision work.
- Blade/Needle: Often sharp or pointed, designed to pierce through tough leather surfaces.
- Chuck or Collar: Holds the needle or blade in place, usually adjustable for different uses.
By mastering this simple tool, you can take your projects from amateur to expert in no time.
Why Is the Leather Awl Important?
Before we jump into the steps, it's important to understand why the leather awl is indispensable in leather crafting:
- Precision
With an awl, you can create consistent holes for hand-stitching, ensuring even and tight stitches.
- Durability
Properly punched holes allow stitching to last longer without tearing the leather around the seams.
- Efficiency
An awl makes the otherwise tough leather-piercing process much faster and easier.
- Detail Work
For intricate patterns, design marking, or delicate stitching, a leather awl provides just the finesse you need.
If you want to work on leather goods that are both functional and aesthetically pleasing, mastering this tool is non-negotiable.
Types of Leather Awls
Not all leather awls are created equal. As a beginner, it’s useful to familiarize yourself with the different types of awls and their specific purposes. Here are four common varieties:
1. Scratch Awl
This is the most basic type of awl. It’s primarily used to mark patterns on leather rather than punching through it. It’s useful for tracing designs or creating guidelines for stitching.
2. Diamond Awl
The diamond awl gets its name from its diamond-shaped blade. It’s the go-to awl for punching sewing holes because it creates a clean, angled hole that’s perfect for stitching.
3. Stitching Awl
This awl integrates a thread needle, allowing you to simultaneously punch holes and sew through the leather. It’s particularly helpful for long stitching processes like those found in handbags or belts.
4. Curved Awl
Perfect for tight or rounded spaces, the curved awl has a bent needle designed for precision in hard-to-reach areas.
For beginners, a diamond awl is highly recommended to get started with stitching and punching.
Step-by-Step Tutorial on How to Use a Leather Awl
Here’s a simple guide to start using your leather awl effectively. Follow these steps, and you'll be creating beautifully stitched leather goods in no time:
Step 1: Gather Your Tools and Materials
Before you begin, make sure you have the following:
- Leather piece for your project
- Leather awl (preferably a diamond awl for beginners)
- Cutting mat or sturdy work surface
- Ruler and pencil for marking guidelines
- Waxed thread and hand-sewing needles (if stitching is involved)
Step 2: Plan and Mark Your Design
- Use a ruler and pencil (or a scratch awl) to lightly mark the stitching line or design outline on your leather.
- For consistency, ensure the spacing between stitches is even. Stitching wheels or stitching chisels can help with this.
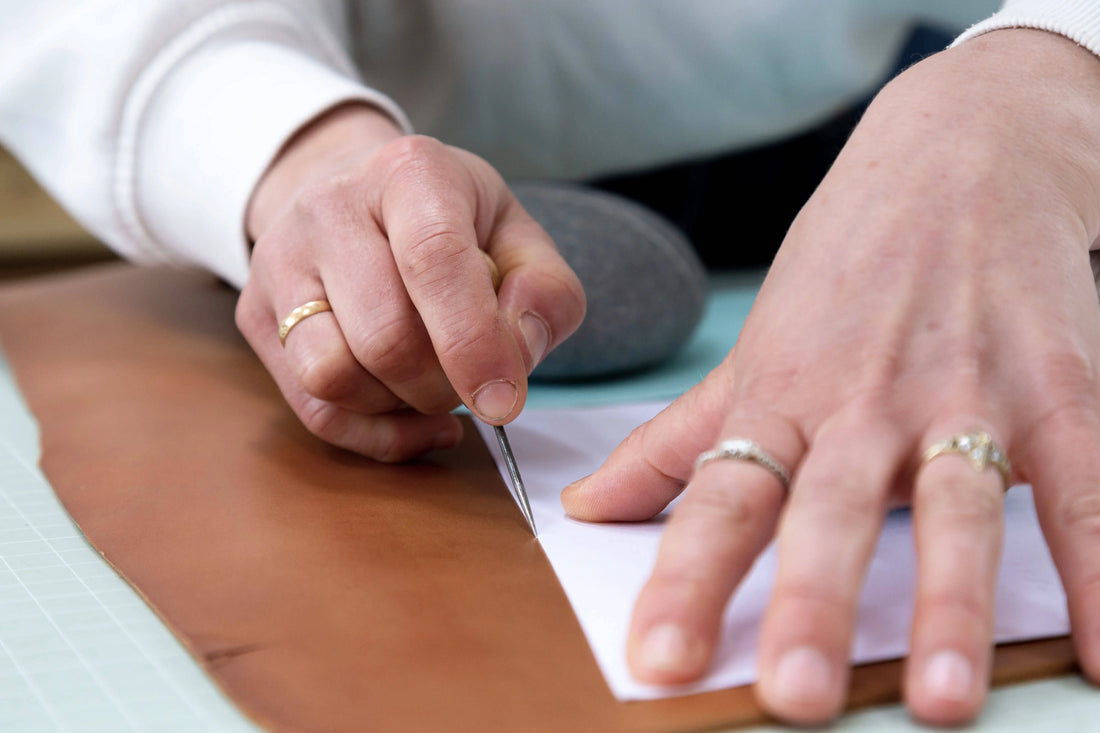
Step 3: Punch Holes with the Leather Awl
- Place your leather on a sturdy, non-slip surface (e.g., a cutting mat).
- Hold the awl at a 90-degree angle to the leather to ensure clean, straight holes.
- Apply firm, controlled pressure to punch through the leather. For thicker leather, consider twisting the awl gently while pressing to avoid strain.
Pro Tip: If your project involves thick leather or multiple layers, you may need to keep the awl sharp for smooth puncturing. Use a fine sharpening stone as needed.
Step 4: Begin Stitching
- Thread your needle with waxed thread and start sewing through the holes you punched. A saddle stitch is a popular choice for durability—it’s a double-threaded stitch that holds your pieces firmly together.
Step 5: Maintain Your Awl
Like any tool, your awl works best when it’s well-maintained.
- Clean the blade after every use to remove leather debris.
- Store the awl with a protective cap on the needle to prevent accidental damage or injury.
With these steps, you’ll quickly get the hang of using the leather awl to produce clean, professional-grade leather goods.
Troubleshooting Common Beginner Challenges
Learning to use a leather awl efficiently can take time. Here are some common challenges beginners face and how to overcome them:
Problem 1: Uneven Holes
- Solution: Double-check your guidelines before punching. Use a stitching template or wheel for evenly spaced holes.
Problem 2: Struggling with Thick Leather
- Solution: Try dampening your leather slightly to soften it. This makes it easier to punch holes while maintaining the material's integrity.
Problem 3: Awl Slipping During Use
- Solution: Ensure your work surface is stable. Additionally, make sure you have a firm grip on the awl by holding it close to the blade for better control.
By addressing these issues, you can make significant leaps in your leather crafting skills.
Tips for Beginners Getting Started with Leatherworking
Using a leather awl is just one part of the larger craft. Here are a few beginner-friendly tips to help you along your leatherworking journey:
- Practice First: Before starting your main project, practice punching and stitching on scrap leather to gain confidence.
- Invest in Quality Tools: Cheap tools may not offer the durability or precision needed for leather crafting. A high-quality awl will make all the difference.
- Start Simple: Begin with smaller projects like coasters or keychains before venturing into larger items like bags or belts.
- Join a Community: Leatherworking forums and social media groups are fantastic resources for asking questions and gaining new insights into your craft.
Learning leatherworking is just like stitching—it takes patience, practice, and a good foundation.
Stitch Your Way to Success
The leather awl is one of the most versatile tools in the leatherworker’s arsenal. It’s the key to creating clean, professional designs and ensures your projects are as sturdy as they are stylish.
Take the time to master this tool, starting with simple projects and gradually building your confidence. Whether you’re stitching a wallet, marking a pattern, or perfecting the placement of every hole, the awl will guide you to precision and craftsmanship.
Now it’s your turn to get hands-on and bring your leatherworking ideas to life. With a little patience (and plenty of practice), you'll be creating pieces that look like they belong on a store shelf in no time. Happy crafting!
Guide written by British Leather Supplies. Explore our range of quality leather awls and other leathercraft tools, hardware and supplies.